Position Text Boxes in Photoshop Using X, Y Coordinates
When positioning text boxes in Photoshop, I typically use an existing composition, where the text box is already in the desired location, as a template. If a graphic slips through the cracks with a misaligned text box, I end up moving it pixel by pixel until it looks correct. But there is an easier way which lets you move a text box to an exact location using X, Y coordinates.
Background
Some of the websites I maintain have a rotating graphics section (aka carousel) which is used to market new features and information. As the section rotates through the graphics, the text descriptions typically stay in the same place which makes it a bit jarring when a text box is out of alignment.
To improve consistency, I use an existing rotating graphic when creating new ones. However, there are occasions where a misaligned text box finds its way into the mix. Instead of starting from scratch to correct the text box, there is a quick way to specify a position down to the exact pixel.
Get X, Y Coordinates
Before moving a text box, you'll need to know where it goes. To do that,
- Open an existing file with a properly positioned text box
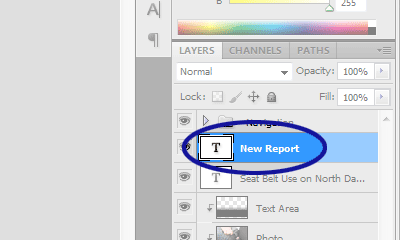
- Click the layer with the text box (see Figure 1)
- Press Ctrl + T
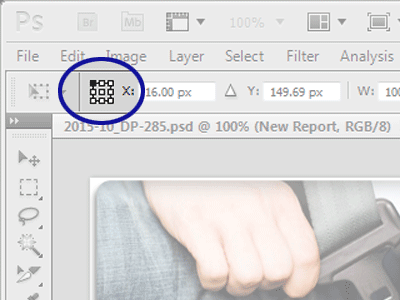
- Set the registration point in the top-left corner (see Figure 2)
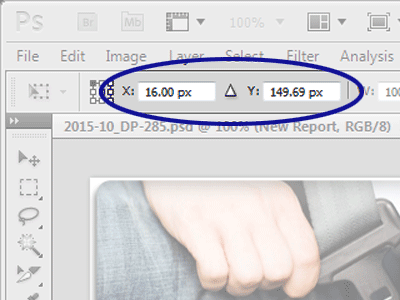
- Write down the X and Y coordinates (see Figure 3)

Figure 1. Select Layer

Figure 2. Set Registration Point

Figure 3. Set Registration Point
Move Text Box Using X, Y Coordinates
Now open the file where the text box is misaligned and
- Click the layer with text box to move
- Press Ctrl + T
- Move the registration point to the top left
- Correct the X and Y coordinates
Final Thoughts
To make the process even faster, you could note the X, Y coordinates somewhere; perhaps you have some documentation for the graphics. That way you just need to review your notes whenever you need to position a text box.


0 Comments
There are currently no comments.
Leave a Comment