Attaching Helper Files to Outlook Notifications
Some tasks are easier to accomplish when additional resources are readily available. When creating quarterly reports, the previous report would make a handy template. For events held annually, samples from last year's social media campaign could be included. Basically, if files are needed, they can be attached to the corresponding calendar entry in Microsoft Outlook. Then we don't need to hunt down a bunch of files when under pressure to complete the task.
Note: the following information is based on Microsoft Outlook 2010 for Windows 2007.
Attaching Files
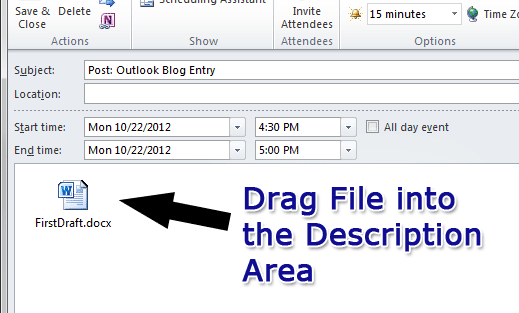
When creating calendar entries, as discussed in "Keep Up with Deadlines by Using Microsoft Outlook’s Notifications Feature", we can drag and drop files into the description field (see Figure 1).

Figure 1. Drag and Drop Files in the Description Area
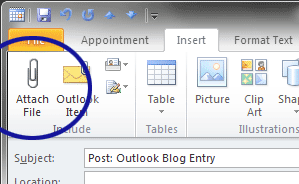
For those uncomfortable with drag and drop, there is an "Attach File" option under the Insert tab (see Figure 2).

Figure 2. Attaching Files Manually
Including Screenshots
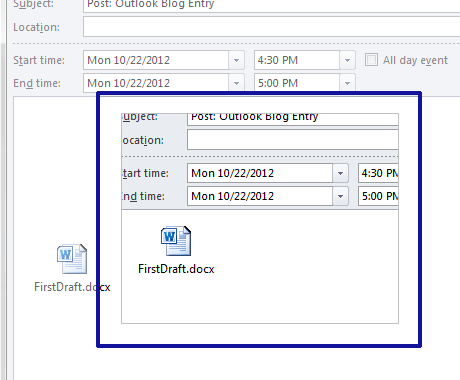
In addition to attaching files, screenshots can be added…and we don't even need to create a JPEG first. Screenshots can be pasted directly into the description area (see Figure 3).

Figure 3. Pasting Screenshots in the Description Area
Conclusion
With the inclusion of attachments and screenshots, completing tasks becomes much easier. No more guessing what was done previously. No more digging through the archives to find examples. And of course, the description area can contain text. So those website links needed for the task have a place too.


0 Comments
There are currently no comments.
Leave a Comment